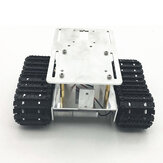
Chasis DIY de robot RC con seguimiento de obstáculos y conjunto de orugas
US$63.51
Una parte de la reseña se ha traducido automáticamente.
nice kit, 12V motors included, suitable for a Raspberry tank


bon article dans l ensemble à voir dans la durée
Turn on subtitles for full instructions. In this video I present a step-by-step on how to assemble a robotic tank using a DIY kit. You can find the kit I've used in the following link: http://bit.ly/2IfjnUC I loved the quality of the parts used in this kit! It comes with lots of spare parts and all the tools needed for mounting the robot. Unfortunatelly the documentation isn't very good. So I made a video on how to assemble the robot! Check it out: https://youtu.be/ghzvPbGS7nk
___
Quick delivery, good packaging, decent parts quality. Followed the video tutorial linked to in a different review and works perfectly!
nice small kit, went together nicely. it was out of stock for quite a while.
This chassis with generic form-factor really suitable for any kind robot fast prototyping. The assembling process is not too complicated. I can complete the assembly with minimal guide in ~30 minutes. And thanks for included backup parts for replacement if in case someday you lost any missing parts. And thanks for the included tools, i.e screwdriver, hex key wrenches. It really helpful.
Envio rapido y buen producto

Amazing delivery time and good quality product, Will asamble soon and upload picture.
Good quality, Very fast delivery. 5 Star

Juguete eléctrico de robot bailarín de policía espacial para niños regalo de Navidad


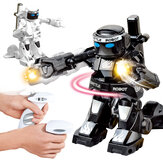
Robot de boxeo RC 2.4G Fighting Iintelligent Multi-Station Battle Juguete interactivo


OWI OWI-997 Robot Inteligente de Detección de Gestos DIY STEM Juguetes para Niños Regalo


JJRC R2 R2S Cady Juguete Robot de Carga USB con Control de Gestos Bailarín